Chord Progressions
Working with the Chord Matrix/Progression Tool
Introduction
This part of Oolimo contains the most common chord progressions that you can find in countless pop songs or jazz standards. Furthermore, it contains snippets of songs or standards that are examples of the use of certain progressions in a larger context. Some of the progressions are repetitive, others are played only once and then may be followed by other chords.
Each of the progressions is shown in every single key and there are mostly several variants using different chord shapes. You may notice that in some keys there are more variants than in others. It's always helpful to learn each progression in several keys.
Changing The Key


By touching the arrow buttons next to the displayed key you can step through the keys Db, D, Eb, E, F,…, respectively B, Bb, A, Ab, G, Gb,… in the other direction. To choose a sharp key (#), choose its flat enharmonic equivalent first and then touch directly on the displayed key. For example, go to Eb with the arrow buttons and touch the displayed Eb which will change to D# (and vice versa by touching the key again).
Why is the key displayed in red color?


The red colour is a double-accidental warning. By touching the key it switches to its enharmonic equivalent, e.g. D# ⇆ Eb.
In most cases, flat keys should be preferred over sharp keys because in sharp keys double accidentals (##) appear more frequently. In the key of Eb major For example, the maj7 is a D, while in D# major it would be a C##! Of course, you will mostly replace those troublesome notes with their simpler enharmonic equivalent, but the use of flat keys is mostly advisable. Just between F# and Gb major, there is no big difference when it comes to double accidentals.
The Matrix
Don't worry! 😉
If looking at the matrix frightens you and you haven't dealt with roman numbers and scale degrees before, just ignore the matrix for now and go to the list (button "list" or button "all progressions"). Choose one of the listed progressions and start practising. After going through a couple of chord progressions in several keys you'll quickly understand the matrix.
Purpose
- The matrix is a filter for the list of chord progressions. By selecting one or several chords you get a list of progressions where all selected chords (orange buttons) occur. The matrix also shows you which other chords can be added to your selection (yellow buttons). More under "Selecting Chords".
- If a chord progression has already been selected from the list and shows up in the chords view, the matrix will show the basic chords of this progression (purple buttons) when you return to the matrix from the chords view or use the dedicated button (the button only works, when a chord progression is actually shown in the chords view!).
The matrix is not only a useful tool for finding chord progressions, it also helps to learn which other chords are commonly coming along with a certain chord.
The matrix contains only chords that are actually present in at least one of the chord progressions that come with the app. Some more chords may be added with more progressions in future updates and the way the chords are arranged may also slightly change.
The chords of the matrix are notated in a universal form. They don't show extensions like 9, b9, #9, add9, 11, b13 or 13. The examples however may contain more complex variants of the basic chord with added tensions and modifications. A V7 chord in the list may therefore appear as V9 = V7(9), V7(#9), etc. in an example in the chords view.
View
The chords of the matrix can be displayed in a general form with the root/bass as scale degree (roman numbers, e.g. Imaj7, IIm7) or in the selected key (e.g. Cmaj7, Dm7).
First Line - Reference
The coloured first line serves as a reference for your orientation. It shows the roots of the selected key while the chord buttons display the scale degrees of the roots (and bass notes in slash chords). With a touch on the dedicated button ( C D E ⇄ I II III ) you can display the scale degrees in the first line and root/bass names in the selected key on the chord buttons.
Selecting Chords
- AND-relation (conjunction): if you select some chords in different columns, the list will only show chord progressions that contain all the chord you've selected. Consequently the more chords you select, the fewer progressions will be listed.
- OR-relation (disjunction): if you select more than one chord in the same column, any of these chords can occur in the progression
By pressing one of the reference buttons you can select the whole column (and deselect by pressing the button again).
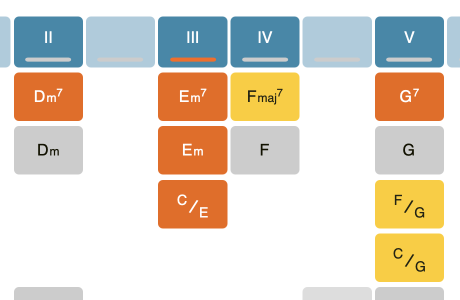
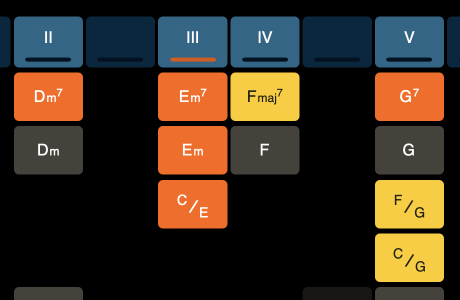
In the shown example the selection means:
| Dm7 | AND | Em7 OR Em OR C/E | AND | G7 |
Highlighting for multiple selections
The moment you select a chord, other chords will be highlighted (with a different colour). These are the chords that appear in at least one of the chord progressions (that are included so far) together with the selected chord(s) and therefore these are the chords you can choose from if you continue selecting.
Resetting the matrix
- Reset your selection by touching each selected button again.
- Use the reset button!
Structure Of The Matrix
The first line is the reference line and has already been described above (View).
Second & Third Line - Diatonic Chords
Let's start on the THIRD line: here you can find the diatonic triads of the selected key. All chord tones are tones of the key respectively major scale, because they are just built by stacking two 3ds over each root, using minor 3rd or major 3rd, depending on the scale degree. For example, in C major: C-E-G (C major chord), D-F-A (D minor chord), E-G-B (E minor Chord), F-A-C (F major chord), etc.). There are several more or less common standard chord progressions using these chords, but you can't do too much wrong trying all kinds of combinations. On the VIIth scale degree, you would find a diminished triad. In practice (especially on the guitar) diminished triads are always played with a diminished 7th (dim7) or a minor 7th (resulting in an m7b5 chord). That's why there's no VIIdim button in this line ...I will add one if I find a good example.
On the SECOND line, the chords have one more (major or minor) 3rd stacked on their top (5th). These are the diatonic 7th chords of the selected key respectively major scale. Together with the diatonic triads, we call them all the diatonic chords of that scale. Because the 7th adds some tension to each chord (especially in a V7, but also in a maj7, not so much in an m7 chord), that is expected to be resolved in a certain way, some progressions sound great while others can be very unsatisfying. Still, you can try a lot of great progressions by experimenting.
Fourth, Fifth & Sixth Line - Diatonic Slash Chords
Especially in pop music, folk/songwriter-genre, etc., certain diatonic chords are often replaced by slash chords. Examples are IIm I/III IV instead of IIm IIIm IV (IIIm replaced by I/III) or I V/VII VIm7 instead of I VIIm7b5 VIm7 (VIIm7b5 replaced by V/VII), instead of a V7 chord you'll often find IV/V which equals a Vsus9 (=V9sus4) chord.
We also find chord here that can be played over a pedal bass (several chords over the same bass note), like e.g. I IV/I V/I I (C F/C G/C C or F Bb/F C/F F or G C/G D/G G,…).
Special Chords
The chords in the following lines mostly contain tones that are not part of the selected key respectively major scale. Provided with that kind of extra tension they only occur in certain harmonic contexts, often following respectively leading/resolving to certain "predetermined" chords:
- Secondary Dominants: m7 or maj7 chords can sometimes be changed to a dominant 7th chord (major chord with minor 7th) if the next chord has its root a fifth below. Examples: Cmaj7 Am7 Dm7 G7 might be changed to Cmaj7 A7 Dm7 G7, because A7 resolves into the Dm7 chord from V to I (like a V7 chord to a I(m) chord. The most well-known secondary dominant is the minor dominant chord III7 (instead of IIIm7). The progression VIIm7b5 III7 VIm7 is better known as "minor II-V-I progression".
- Substitutions: e.g. bII7 instead of V7 (tritone substitution).
- Diminished passing chords: they mostly occur in unstable even times/measures, e.g. Cmaj7 C#dim7 Dm7 G7 ...by the way C#dim7 can also be seen as A7b9 without the root being played...
- Other chords here are for example the #IVm7b5 chord, which results from playing a IVmaj7 chord when we raise the root by just a half step. A bIImaj7 can have a great effect when it is played instead of a I or Imaj7 chord first end finally resolves into a I chord (in that situation often a I6/9 chord because of its final character). That so-called "delay of resolution" is great for pathetic endings.
- Minor sixth chords (m6): they often replace a dominant 7th chord. If you play a V9 =V7(9) chord with the root on A-string and then move the root down to low E-String (a perfect 4th down), you end up with a IIm6 chord (in relation to the chosen Vth). For example, a G9 chord becomes a Dm6 by doing so. Or see the Dm6 as a G9 (V7)chord whose root got stuck on the IInd degree. Consequently a IVm6 chord equals a bVII9 =bVII7(9) chord, with its root stuck on the IVth degree. For example, Fm6 is like a Bb9 with F in the bass instead of Bb.
The List
Please don't misunderstand...
This is a list of chord progressions and not a list of songs, that you can learn here. Songs are just named as an example where you can find a certain chord progression. Sometimes though a whole song consists of just that one chord progression.
Choosing A Chord Progression
If you touch a progression in the list, you'll immediately see the chords in the chords view. If you go back, you'll see your progression highlighted with a coloured background.
Changing The Key
If you change the key in the list view, the key also changes in the other views (chords view and matrix). In the chords view, you'll then see the 1st variant of that key. The reason is that different keys may have different numbers of examples (variants) for each key. That also means that variant 3 may be variant 4 or 2 in another key or not even available anymore (because it goes too high or too low on the fretboard).
The Chords View
Display The Chord Diagrams Of A Progression
To display the fretboard diagrams of a chord progression, you must select a progression in the list view. The displayed chord progression remains saved if you close Oolimo or switch to another part of the app (e.g. Chord Finder or Help).
Changing Your Selection (Matrix)
If you are changing your selection in the matrix, the actual chord progression remains in the chords view (and the list) unless you select a chord that isn't part of the progression.
If you did this unintentionally, you can return to the "lost" chords by undoing the changes in the matrix that were causing the loss of the displayed progression by deselecting the chords, that do not occur in the progression.
Variants


For the most chord progressions you can display several variants with different chord shapes. Use the arrow buttons to navigate through the variants. Between the arrow buttons you can see which variant you actually see and how many are offered in the actual key. The number of variants may change in a different key, because some tones may fall below fret zero or would become hard to reach high up on the fretboard.
Changing The Key
Because the number of variants may vary from key to key, you will always see the variant number one after changing the key. That might be annoying when trying to change the key of a certain variant and I'll work on a better solution...
Optional Spots in Fretboard-Diagrams
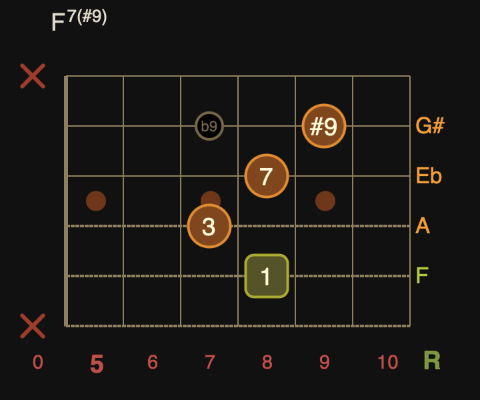
In some chord shapes, you'll detect one or more optional spots (smaller, round and not filled with colour). These tones can be played or omitted arbitrarily. You can also play them temporarily to create a little melody within the chord accompaniment. In the shown F7#9 you may e.g. play the #9 first and then play the b9 which resolves perfectly (by a half step) into the 5th of a Bbmaj7 or Bbm7 on the 6.fret.
The info text (note or interval) on optional spots is only displayed from a certain spot size. If necessary, you have to enlarge the fretboard diagrams by using the magnifier icon (+).
Buttons
When the "super correct button" is activated (green), tones with double accidentals (bb,##) as well as E#, B#, Cb and Fb will be displayed correctly that way instead of being replaced by their enharmonic equivalent (which is theoretically incorrect, but sometimes more practical and easier to read).
"Spot info button": toggles between note names and intervals being displayed on the spots.
In the chord progression tool, you can toggle the orientation of the fretboard diagrams between horizontal (here default) and vertical.Right/Left Hand Mode
The orientation for right-handed and left-handed people can be changed in the menu bar and applies to all fretboards on the website. An "R" respectively "L" shows the actual mode in one of the bottom corners of each chord diagram.
Keep In Mind
The following aspects can be a reason that selecting chords in the matrix can result in some progressions falling through the cracks. Sometimes you may have to start searching with some slightly modified selections, e.g. one time with pure minor chords, one time by selecting m7 chords, another time with both selected (AND/OR relation - described above).
- One chord can sometimes have different names/interpretations. For example, a Vsus9 =V7sus4(9) chord is often seen and written as slash chord IV/V, e.g. F/G instead of Gsus9.
- Sometimes it's possible to replace a chord of a progression with another chord that would be represented by a different button in the matrix. Most common example: especially minor chords can almost arbitrarily be played with or without a 7th, no matter whether you write "m" or "m7" on a music sheet.
- Sometimes it's even possible to replace one or more chords of a progression with not only a different chord type, but even a different chord with a different bass note (e.g. tritone substitution, diminished chord a half step higher instead of a V7(b9) chord,…). In that case the chord progression is listed as a different progression. Of course it's not possible to put the whole theory in the app, but there will be more explanatory notes in future updates.
Please understand the given chord progressions as examples and avoid trying to derive rules from them, like "in this progression, you always write Gsus9, while in the other one it's always F/G" or "in that progression it's pure minor, never play m7 here"...
Music is art, is creative, allows different approaches, variations and perspectives. A tool like this can hardly do justice to all of that. There's for sure a lot of room for improvements in the future, but I hope that the chord progression tool is already very helpful and serves you well by now!